Announcing Scene Flow: AI Assisted Scene Creation
Scene Flow shows a scene's screenplay and its storyboard as one page. Each shot sits under the beat or line it covers, so an edit to either side reaches the other with no sync step. From there you draw the references, Break into shots, frame each shot with Shoot with AI, and press Render scene.
The screenplay and the storyboard on one page. We took a one-paragraph premise to a voiced, rendered six-shot dialogue scene without leaving it. Every image below is a screenshot from that session.
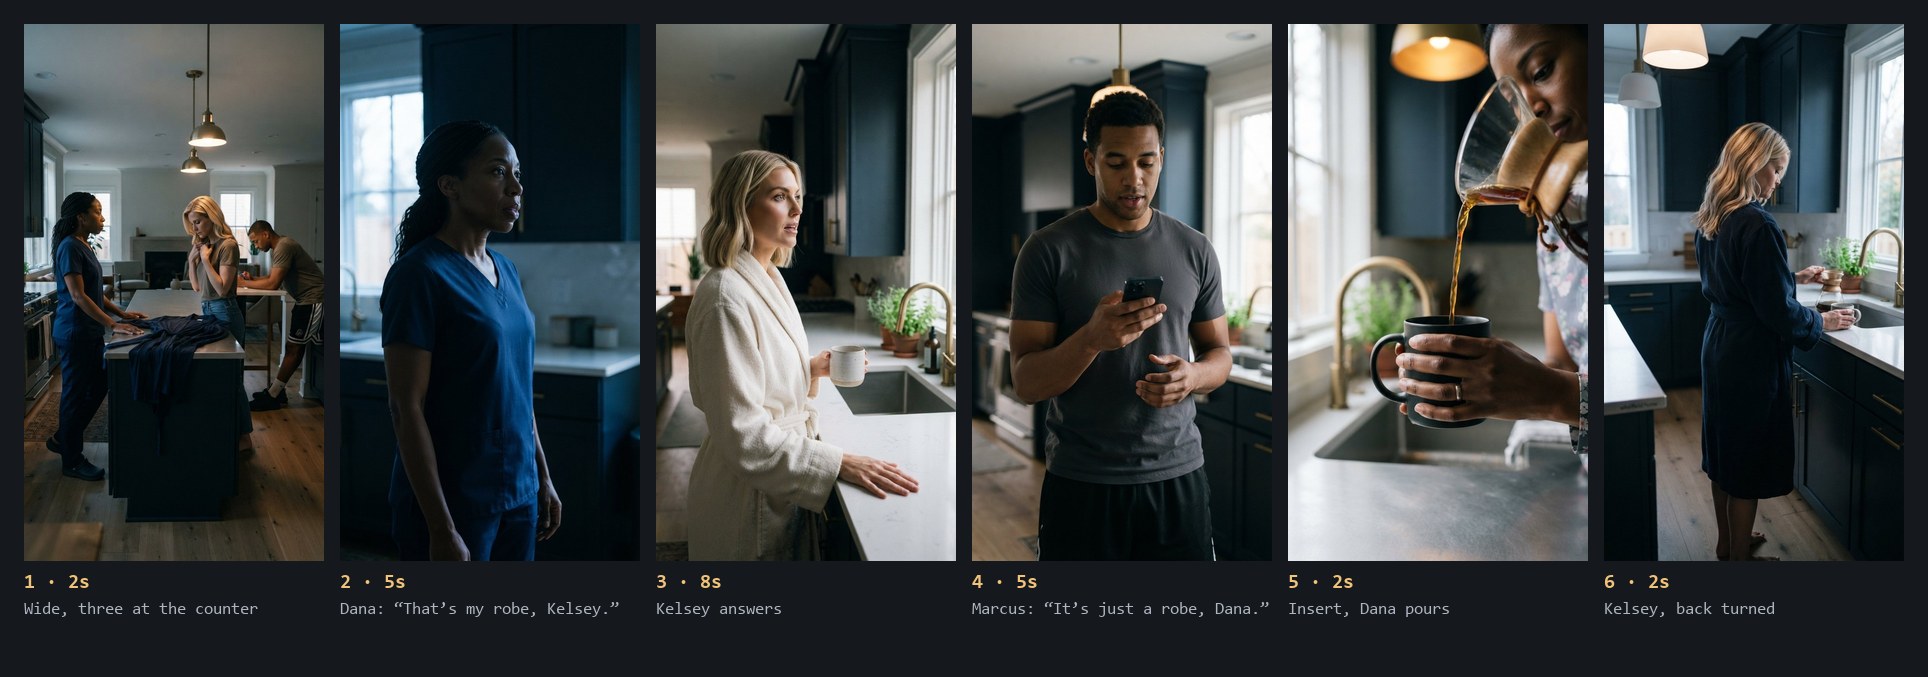
Scene 4, INT. WHITFIELD HOME — KITCHEN — DAWN, as it stands at the end of this walkthrough. 9:16, photoreal, 24 seconds of picture. Demo project: Her Stolen Life, Episode 1, built October 2026 on showmaker.studio.
Most AI video tools give you two places to work. You write in one, then carry the scene into another to make pictures, and the two drift apart the moment you change a line. Scene Flow puts them on the same page. The scene's action beats and dialogue lines run down the middle of the screen as a screenplay. Each shot sits under the beat or line it covers, as a card holding its start frame, its references and its finished still. A preview of the whole scene plays alongside.
Edit a line and the shot under it knows. Draw a frame and the script knows. Nothing needs to be synced by hand.
Here is one scene, built from nothing, in the order we did it.
Step 1 · It starts as one paragraph
Our premise was a classic "husband stealer" setup, placed deliberately in suburban Atlanta. Dana Whitfield is a pediatric ER nurse who works nights. Her husband Marcus owns a struggling car dealership. Her best friend from college, Kelsey Brooks, moves into the guest room after a divorce and starts quietly taking Dana's place: cooking Marcus's breakfast, wearing Dana's robe, sitting in Dana's seat at church.
We pasted it into the Drama Builder and pressed Generate 60-episode outline.
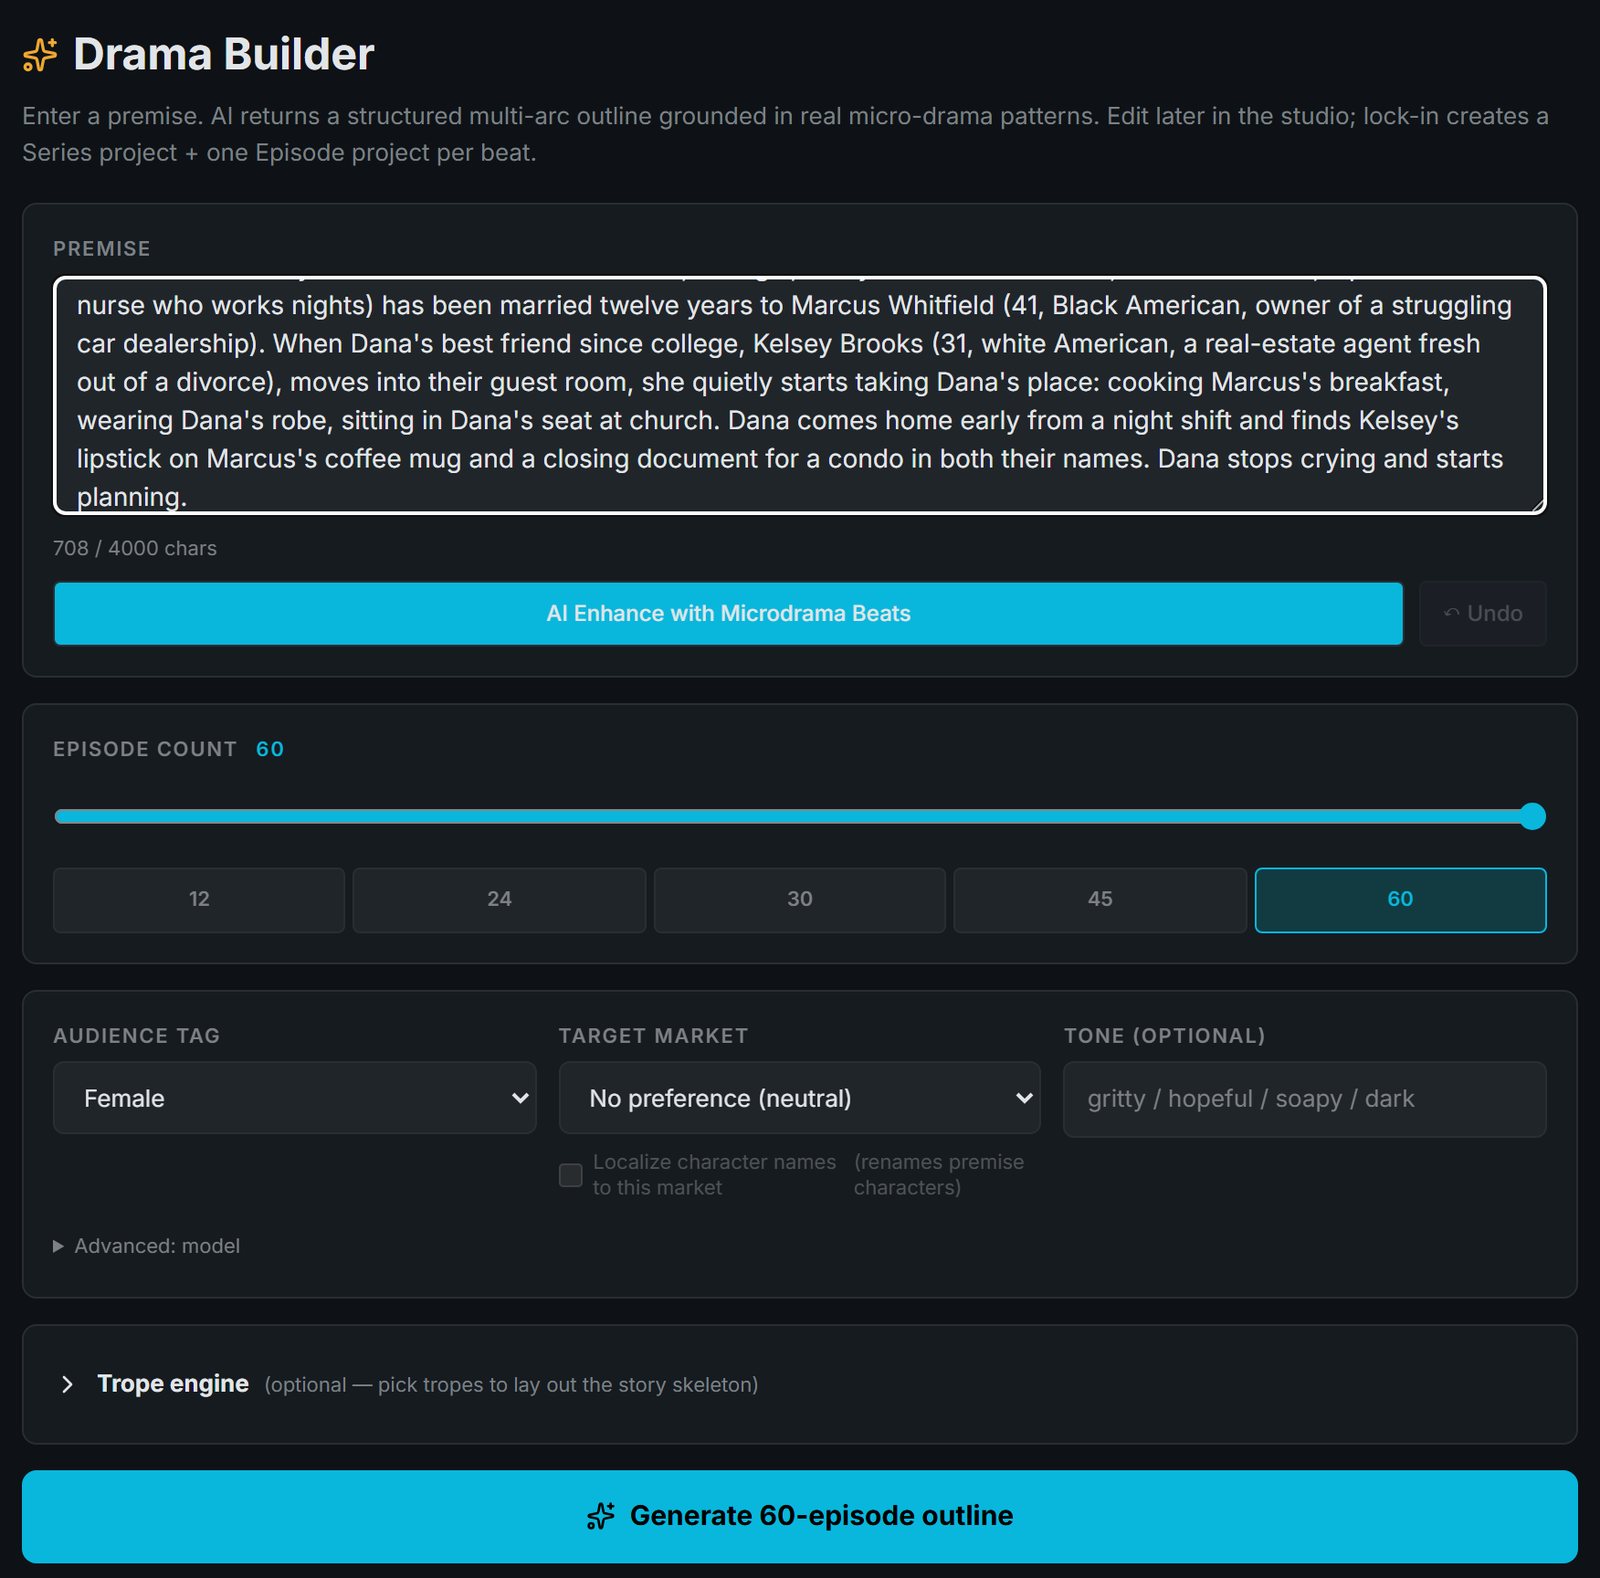
The Drama Builder. The premise box, an episode count (12 to 60), the audience and market, and an optional trope engine. One press writes the whole series outline.
The outline came back in 74 seconds as Her Stolen Life. It names Dana's wound ("feeling invisible and taken for granted in her own home") and lays out four ladders she climbs over 60 episodes. It also scores the outline against the patterns that make short dramas travel: thumb-stop open, dramatic irony, status reversals, cliffhanger discipline. This one scored 94 out of 100.
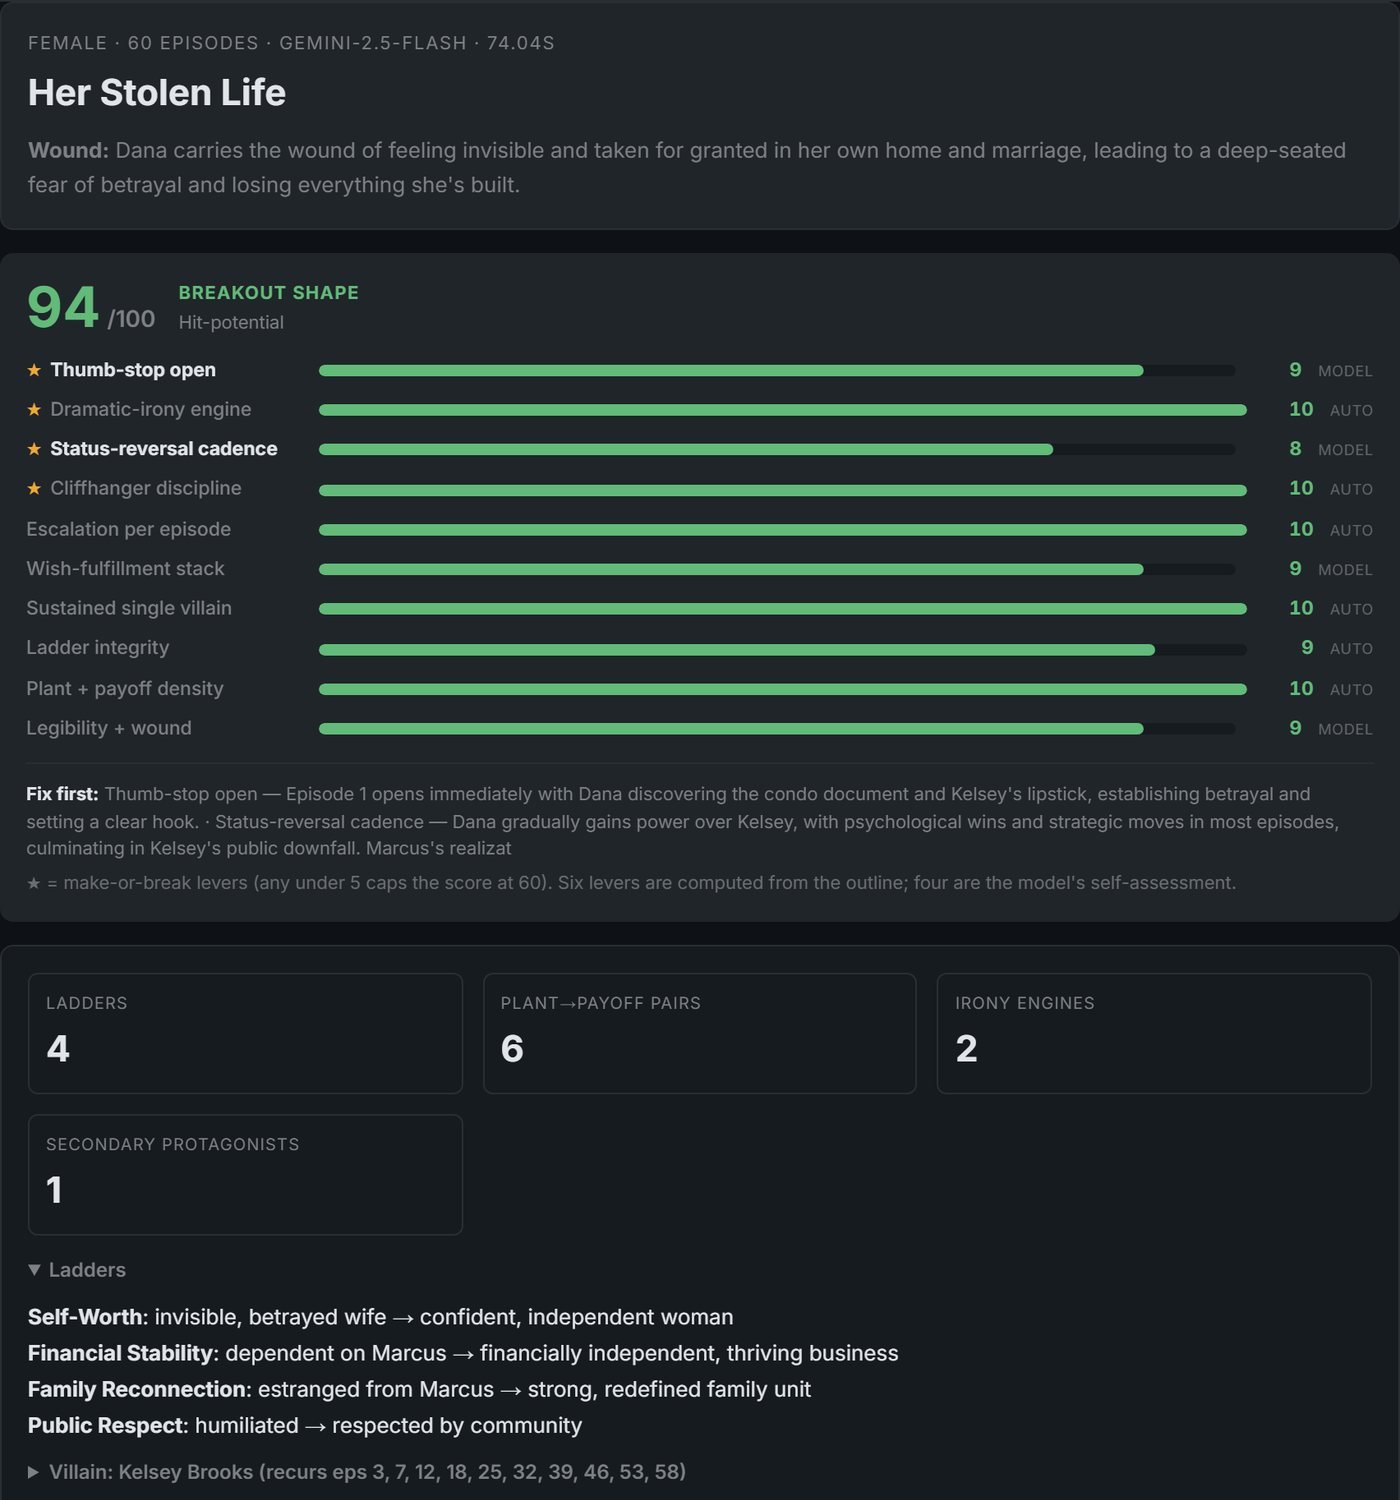
The outline card. Six of the ten scores are computed from the outline's structure and four are the model's own assessment; the card says which is which. Kelsey is marked as the recurring villain, with her return episodes listed.
Locking the outline in creates a series project and one project per episode. In the background, Episode 1 gets a written screenplay of seven scenes with action beats and dialogue. The cast (Dana, Marcus, Kelsey and a friend named Brenda) and six locations are created with it, along with each character's outfits, such as Dana's nurse scrubs and Kelsey's real-estate-agent look.
Step 2 · The scene opens as a screenplay
Scene 4 is the morning Dana notices. She comes home from a night shift to find Kelsey in her kitchen, in her robe, and Marcus not looking up from his phone. In Scene Flow it opened like this:
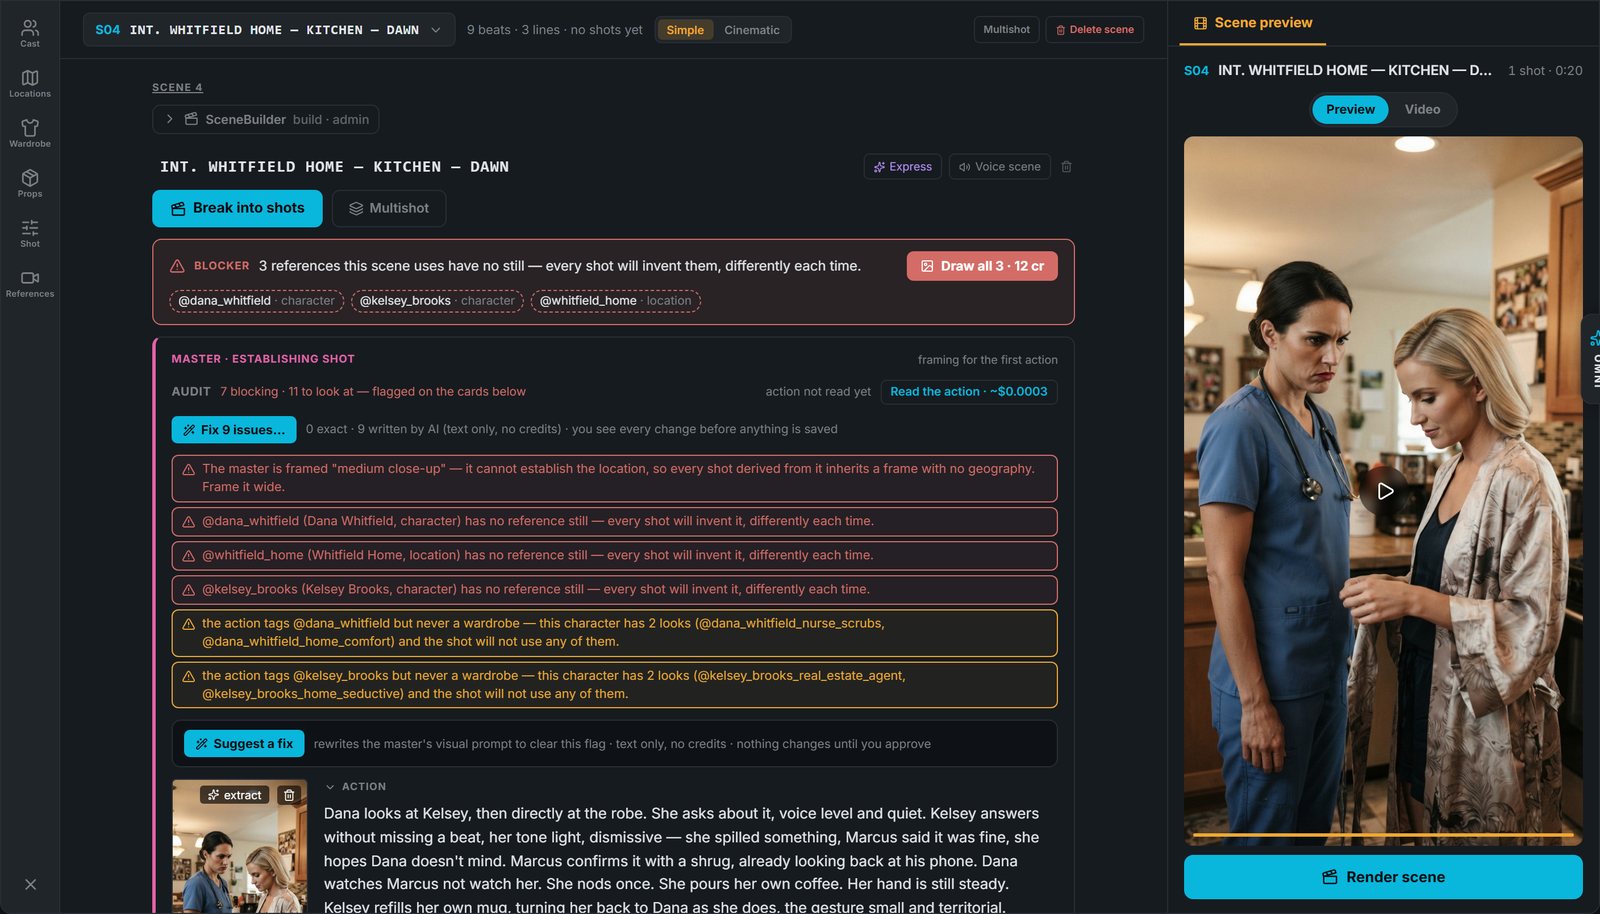
Scene 4, untouched. The bar across the top reads “9 beats · 3 lines · no shots yet”, the honest state of the scene. Underneath are the master frame, its audit, and the action text. The preview on the right already plays the scene's one establishing frame.
Three things on this screen are easy to miss and matter a lot.
The scene tells you what it is missing
The red BLOCKER says that three references this scene uses (@dana_whitfield, @kelsey_brooks and @whitfield_home) have no reference still. Without one, every shot would invent Dana's face and the kitchen afresh, and differently each time. The fix is on the banner: Draw all 3 · 12 cr.
The audit reads the scene before you spend anything
Below the blocker, an audit lists what will go wrong. The master is framed as a medium close-up, so it cannot establish the room. The action tags Dana but never one of her two outfits, so the model would dress her however it likes. Fix 9 issues… rewrites the prompts to clear these flags. It is text only, costs no credits, and shows you every change before anything is saved.
Everything is a tag
Characters, outfits, rooms and props are @slugs. A prompt that names @dana_whitfield_nurse_scrubs sends the drawn wardrobe sheet to the image model with it. That is how the scrubs stay the same scrubs across six shots.
Step 3 · Draw the people and the room once
One press on Draw all 3 drew a character sheet for Dana and one for Kelsey, plus a plate of the Whitfield kitchen. The button counts down while it works.

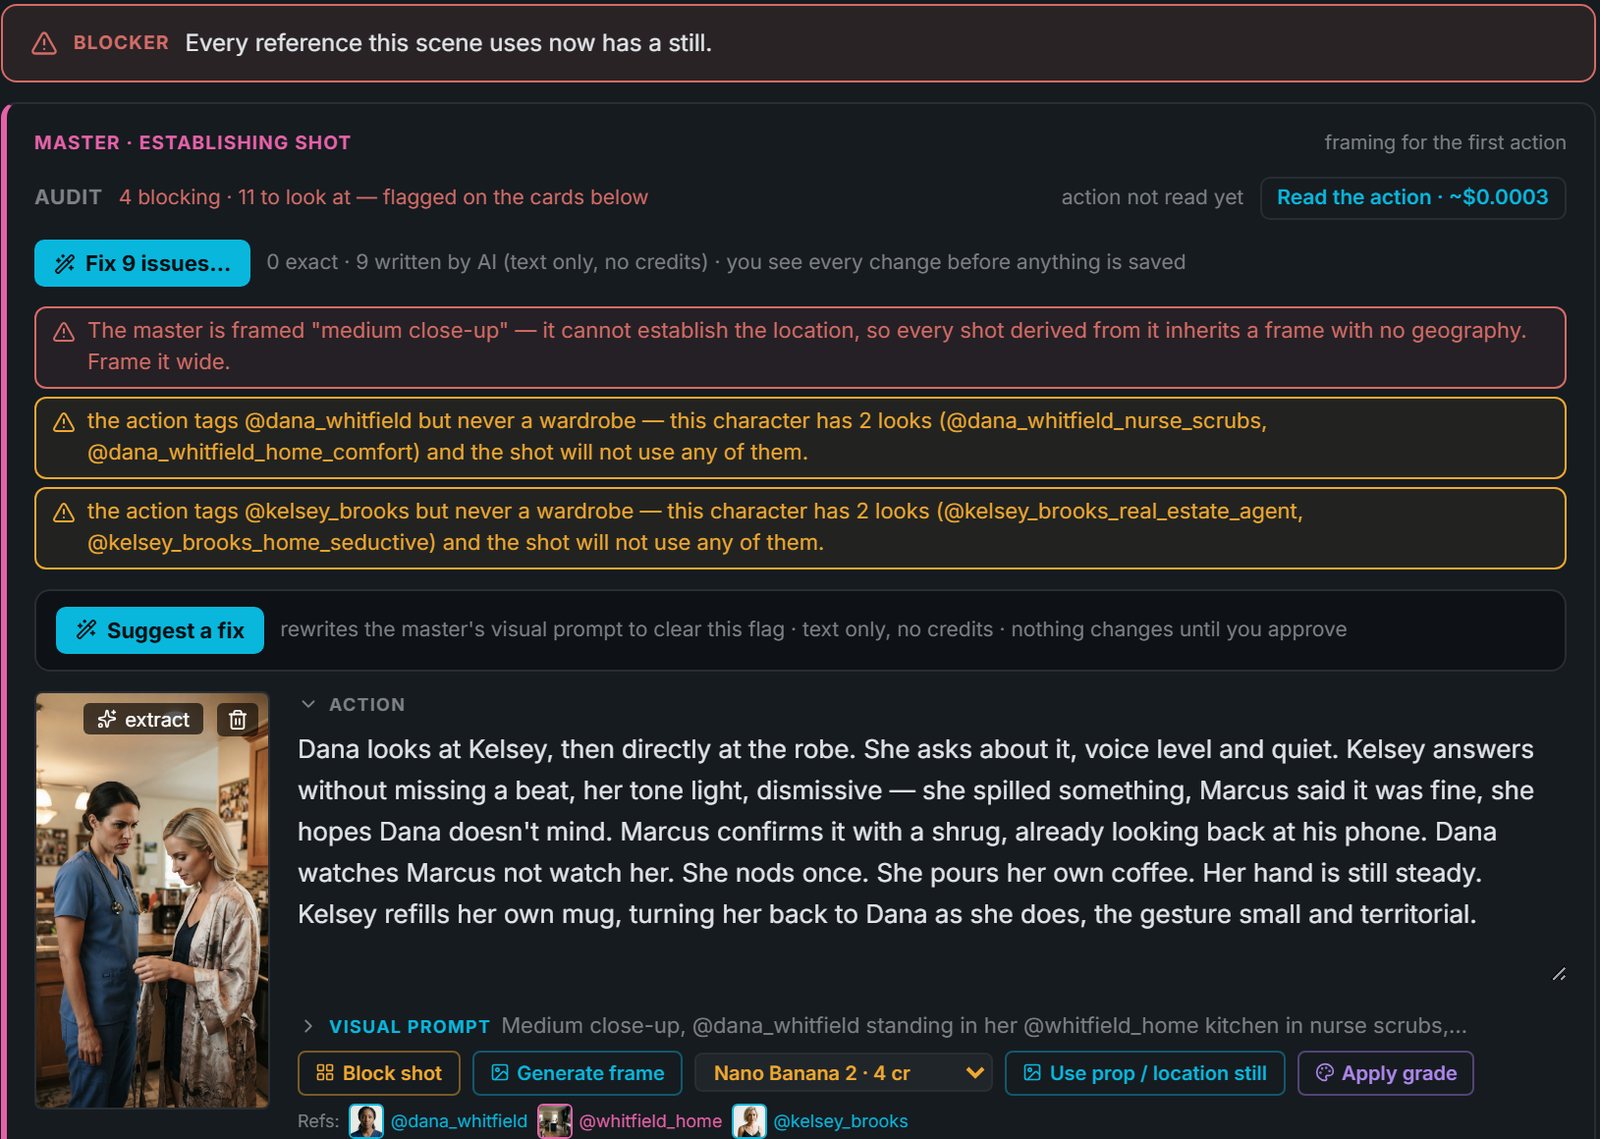
After the draw. The missing-reference flags are gone from the audit, and the master frame's Refs row now shows three thumbnails. Those are the images every later shot of this scene is drawn against.
Step 4 · Break into shots
Break into shots reads the beats and the three lines and plans the coverage the way an editor would want it: an establishing wide, a single on each speaker, an insert, and a reaction. It took 22 seconds. Each shot was filed under the beat or line it covers, and the button turned into Re-cover shots.
| # | Shot | Covers | Length |
|---|---|---|---|
| 1 | Kitchen, wide, three at the counter | Dana looks at Kelsey, then at the robe | 2s |
| 2 | Dana, medium close, level, speaking | DANA: "That's my robe, Kelsey." | 5s |
| 3 | Kelsey, medium close, level, answering | KELSEY: "Oh, I know, I'm sorry — I spilled wine on my blouse last night…" | 8s |
| 4 | Marcus, medium close, level, speaking | MARCUS: "She needed something to wear. It's just a robe, Dana." | 5s |
| 5 | Dana, close on hands, pouring coffee | She pours her own coffee | 2s |
| 6 | Kelsey, medium, back turned, refilling mug | Kelsey refills her own mug, her back to Dana | 2s |
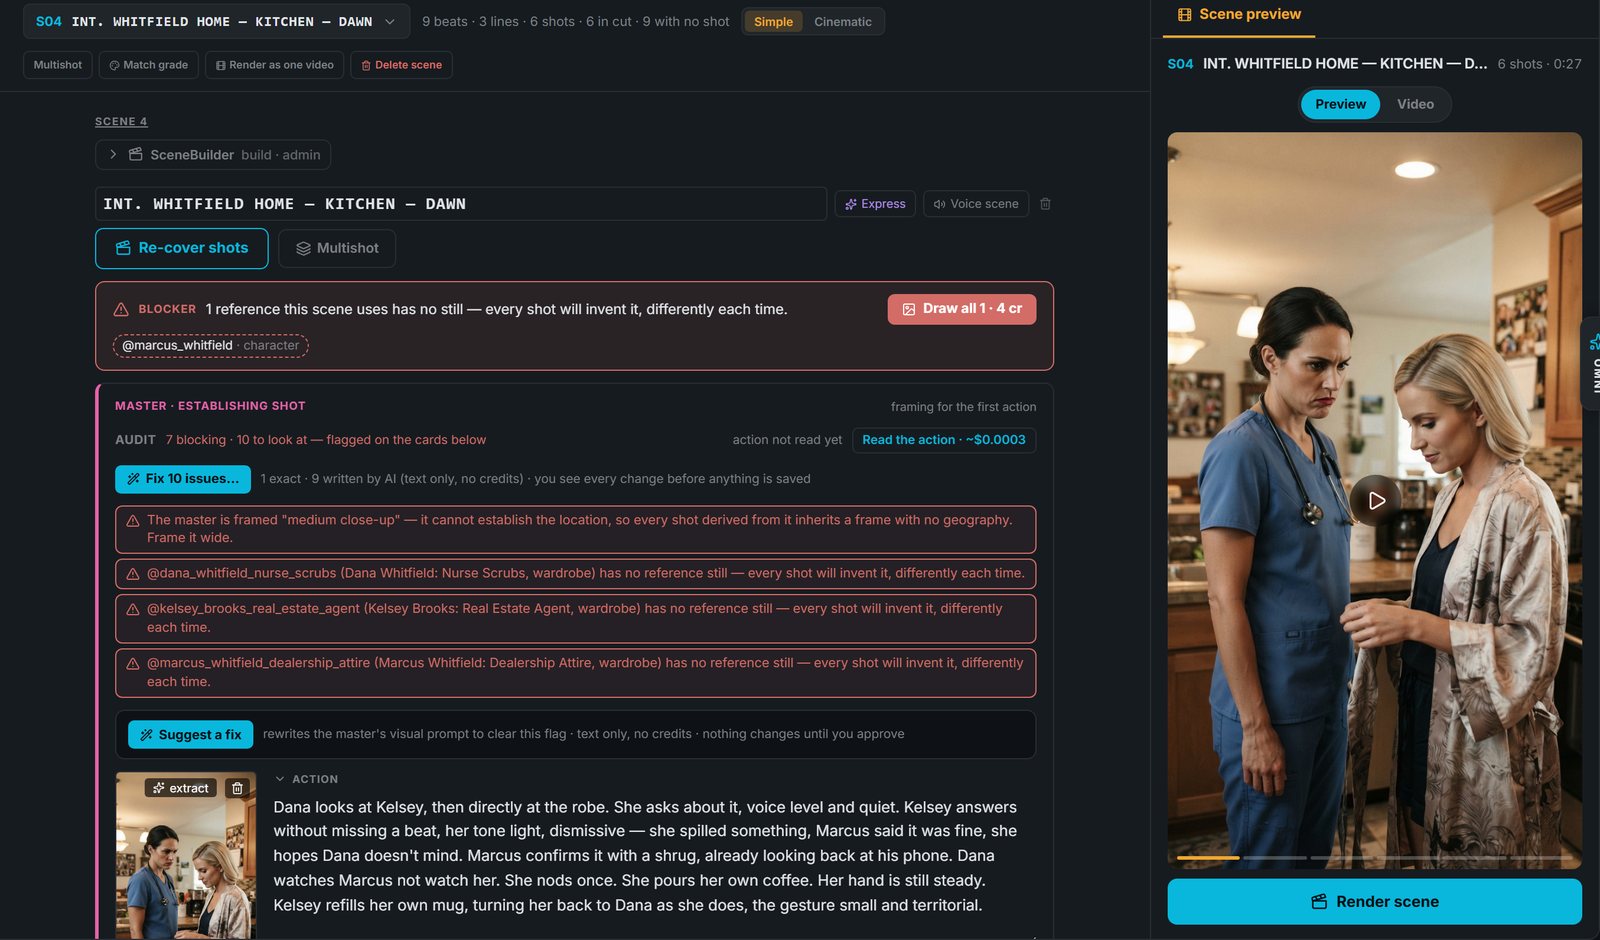
After the breakdown. The top bar now reads “6 shots · 6 in cut”, and the scene preview is 0:27 long. The blocker updated itself as well: the new shots name Marcus and three specific outfits, so it asked for those sheets next. We drew them the same way.
Step 5 · Frame each shot in conversation
Every shot card has a Shoot with AI button. It opens a two-step dialog: first the still (the start frame), then the video (what moves). The AI writes a prompt for each step. You can edit the prompt directly or tell the AI what to change in plain words. Nothing reaches the shot until you press Save to the shot.
Here is Shot 2, Dana's line: "That's my robe, Kelsey."
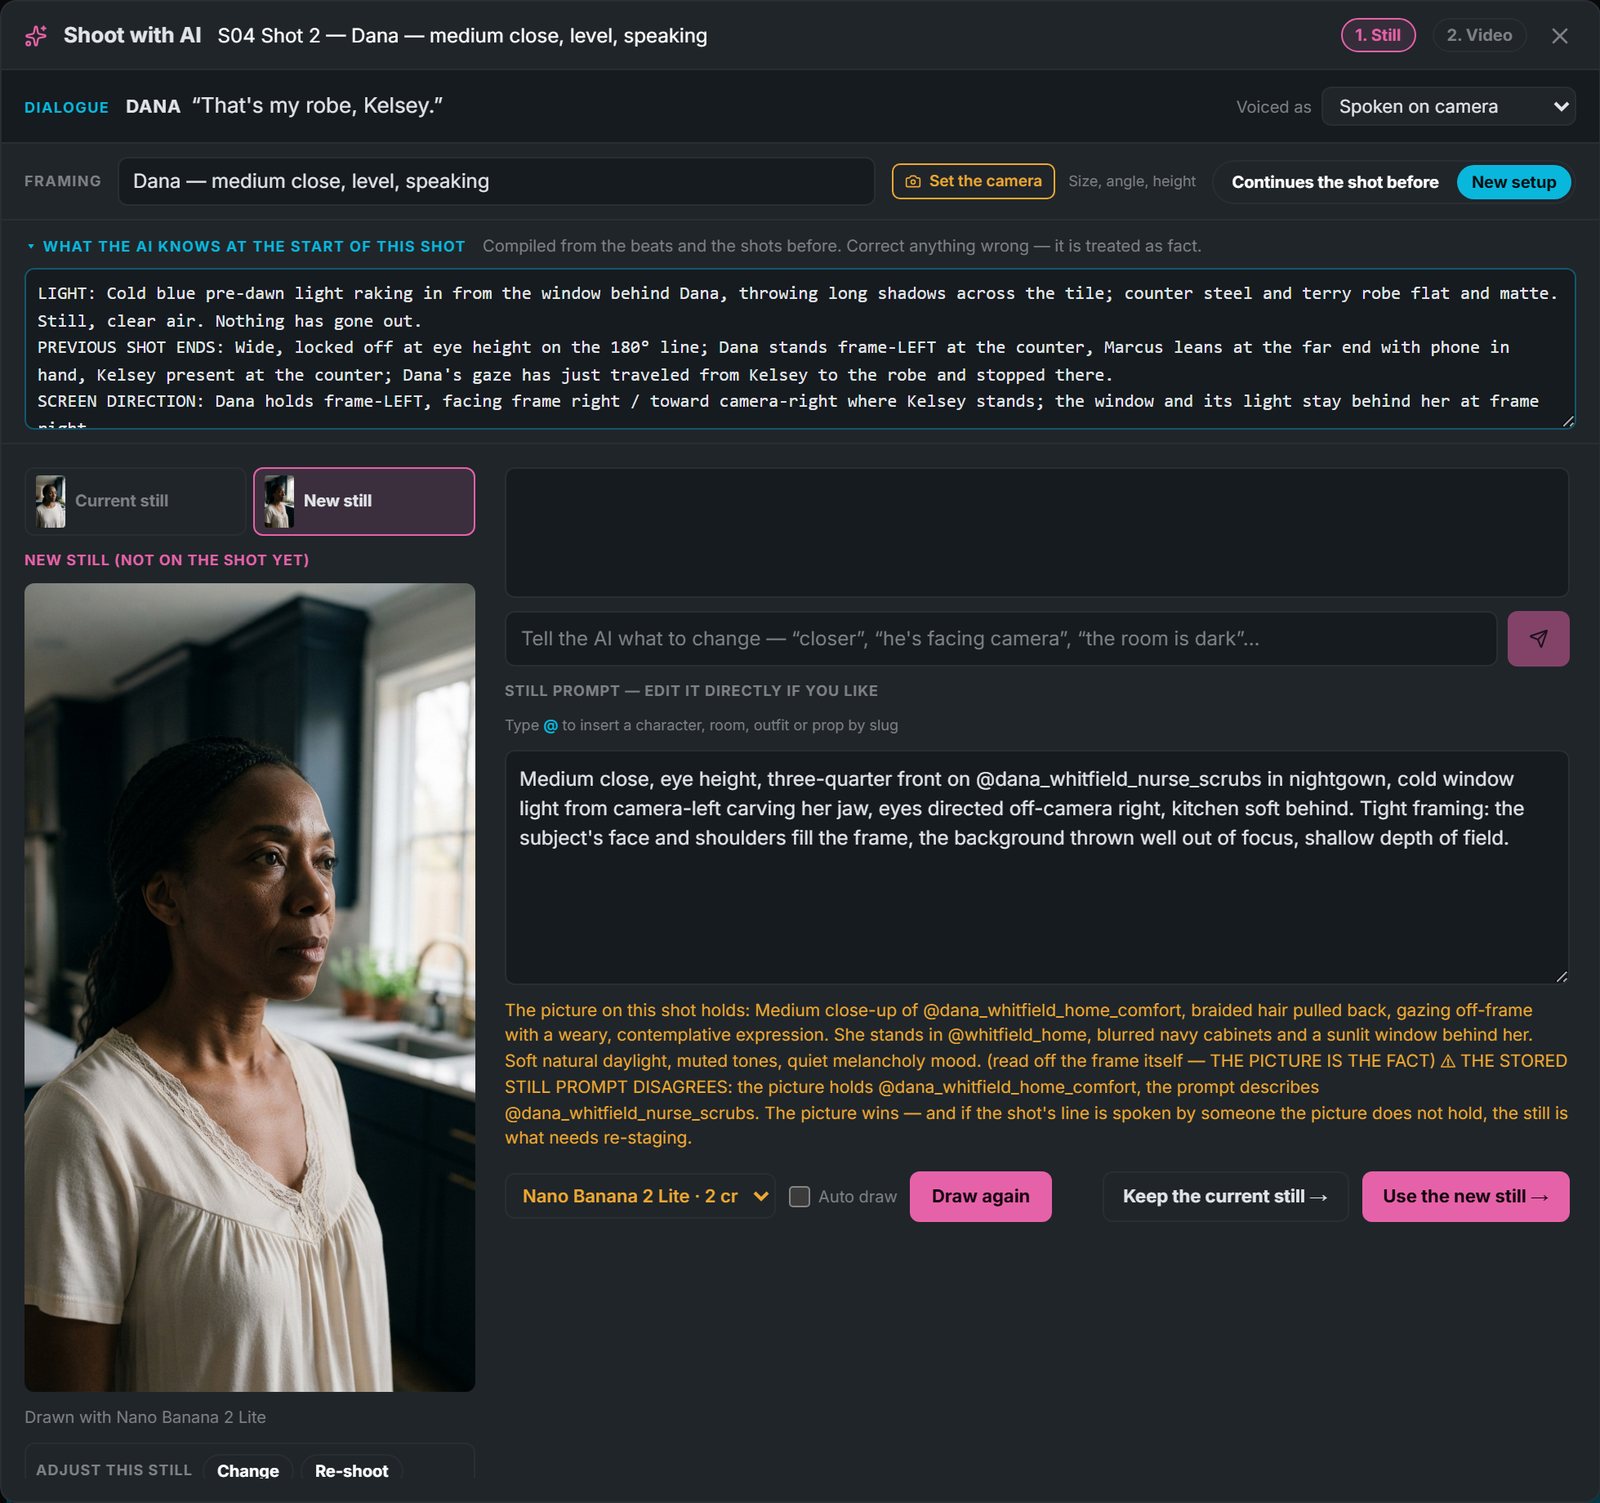
The still step, first take. At the top are the line, who speaks it and how it is voiced, and the framing. The block below it is the AI's continuity sheet. On the left is the drawn still; on the right, the prompt that drew it. The model picker shows each draw's price (Nano Banana 2 Lite · 2 cr).
The AI keeps a continuity sheet
The panel headed What the AI knows at the start of this shot is compiled from the beats and the shots before it. It records where the light comes from ("cold blue pre-dawn light raking in from the window behind Dana"), how the previous shot ends, and which side of the frame each person holds. You can correct any line of it, and a correction is treated as fact for every later turn. The toggle beside the framing, Continues the shot before / New setup, controls how much this shot inherits from the one before it.
It reads the picture, not just the prompt
The orange note under the prompt comes from the AI looking at the image already on the shot. It reported that the frame held Dana in her home outfit while the prompt asked for scrubs, and it said which one wins: "The picture is the fact." Stored prompts go stale after a re-shoot, and the picture does not.
Then we corrected it
The first draw put Dana in a cream nightgown. She has just walked in from a twelve-hour night shift, so that is wrong. Rather than rewriting the prompt by hand, we typed one note into the box:
DIRECTOR: She is still in her nurse scrubs from the night shift — keep her in the scrubs, not a nightgown.
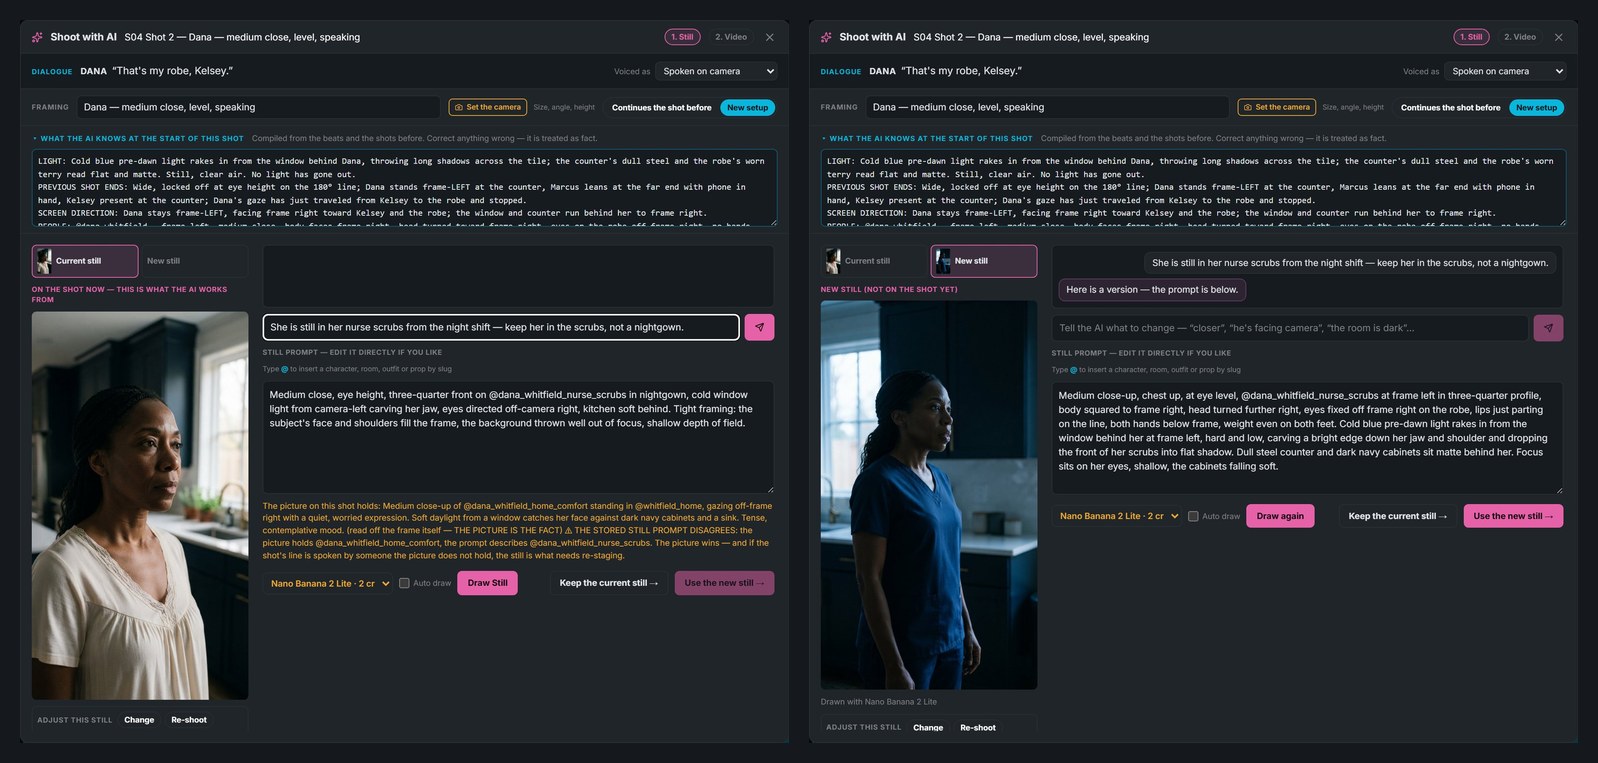
Left: the note goes in the chat box, which suggests examples like "closer", "he's facing camera" or "the room is dark". Right: the AI rewrote the prompt and we redrew: navy scrubs, three-quarter profile, the window light behind her carving an edge down her jaw. Use the new still puts it on the shot.
Then the motion
Step two writes the video prompt from the frame you just approved. It keeps the still's framing and cast exactly, adds the camera behaviour, the light, where focus sits and the performance, and puts the line in verbatim. The AI explains its choices in a sentence above the prompt. Here it kept the camera locked off "so the whole five seconds rests on her face".
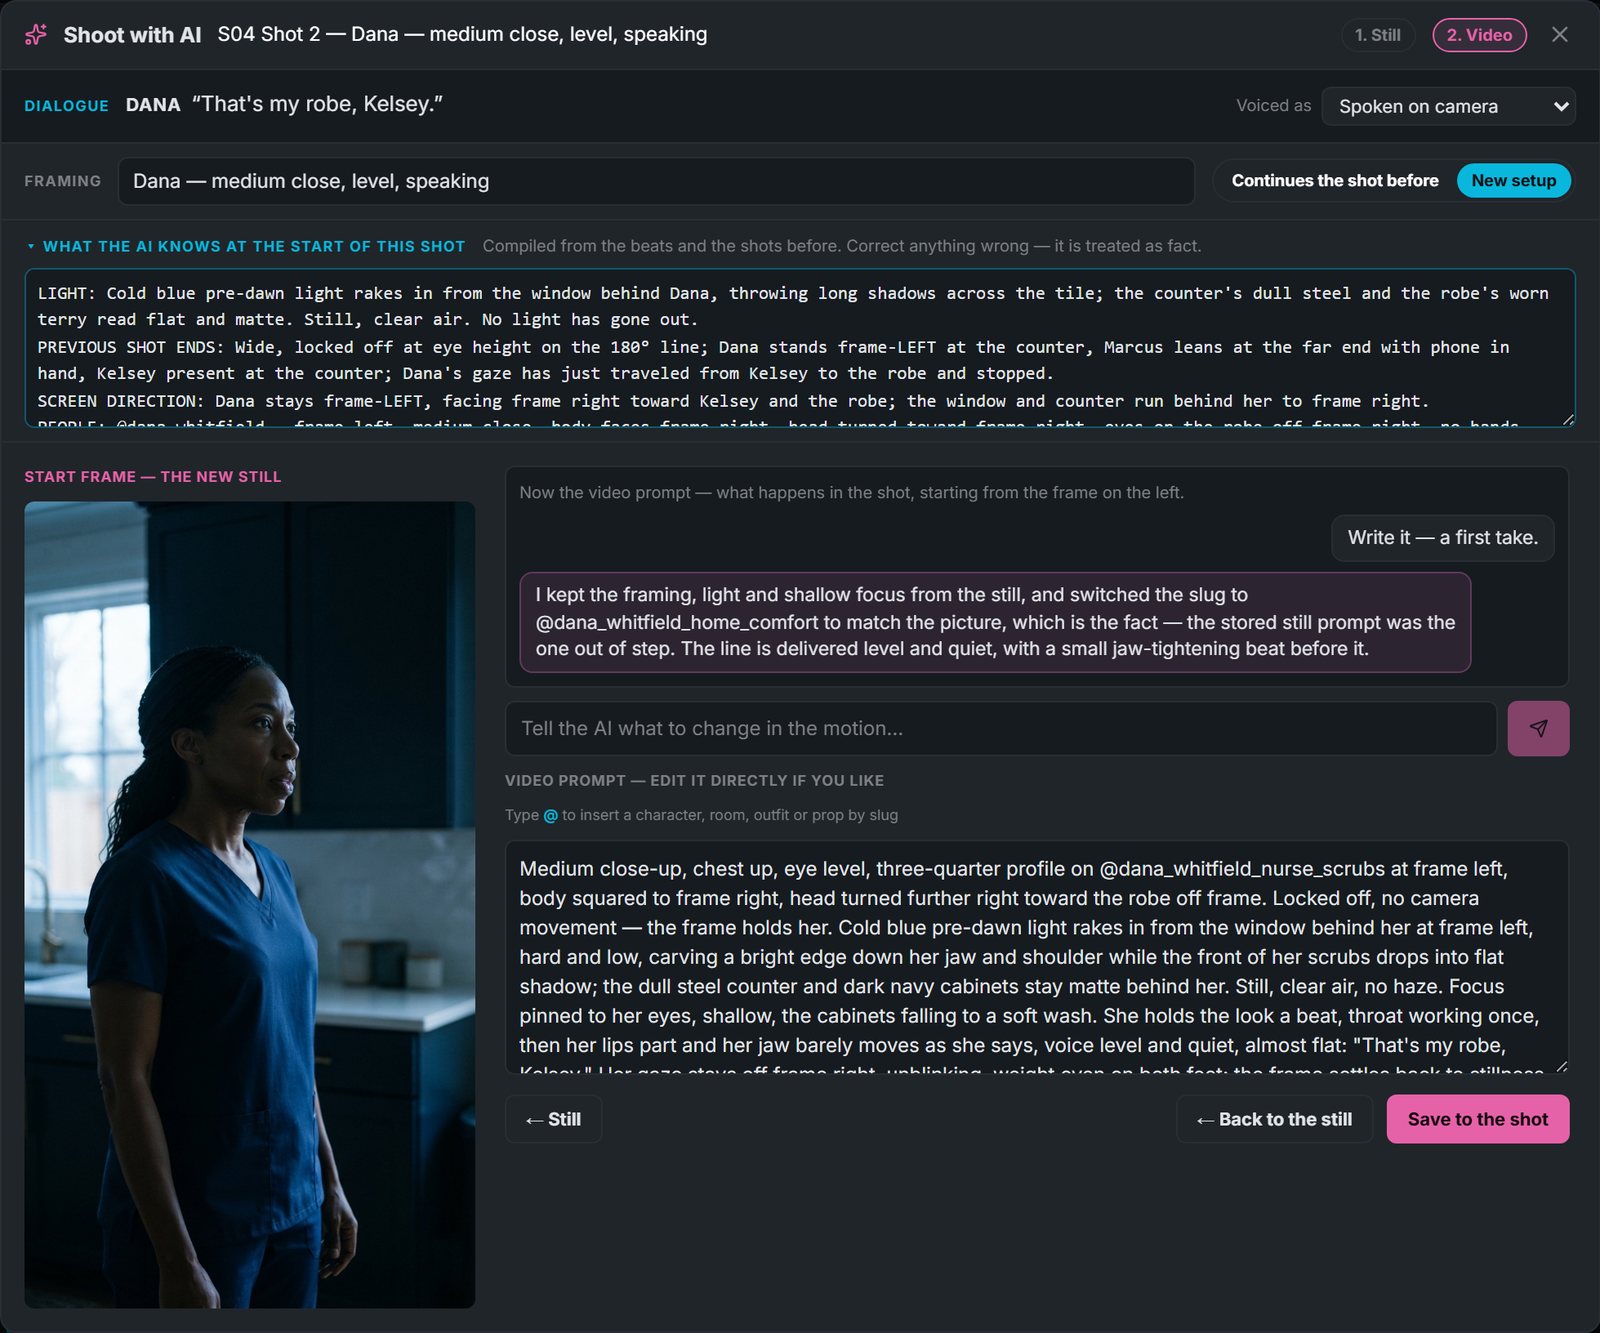
The video step. The start frame stays on screen while you work on the motion. Save to the shot writes the still and both prompts at once.
We ran the other five shots the same way, each with one continuity note about the wardrobe. Each took under a minute.
Step 6 · Every line with its shot under it
With the frames drawn, the scene reads top to bottom as script and storyboard together. Each dialogue line shows who says it, an estimate of its spoken length, and a Generate voice button. Directly below it is the shot that covers it.
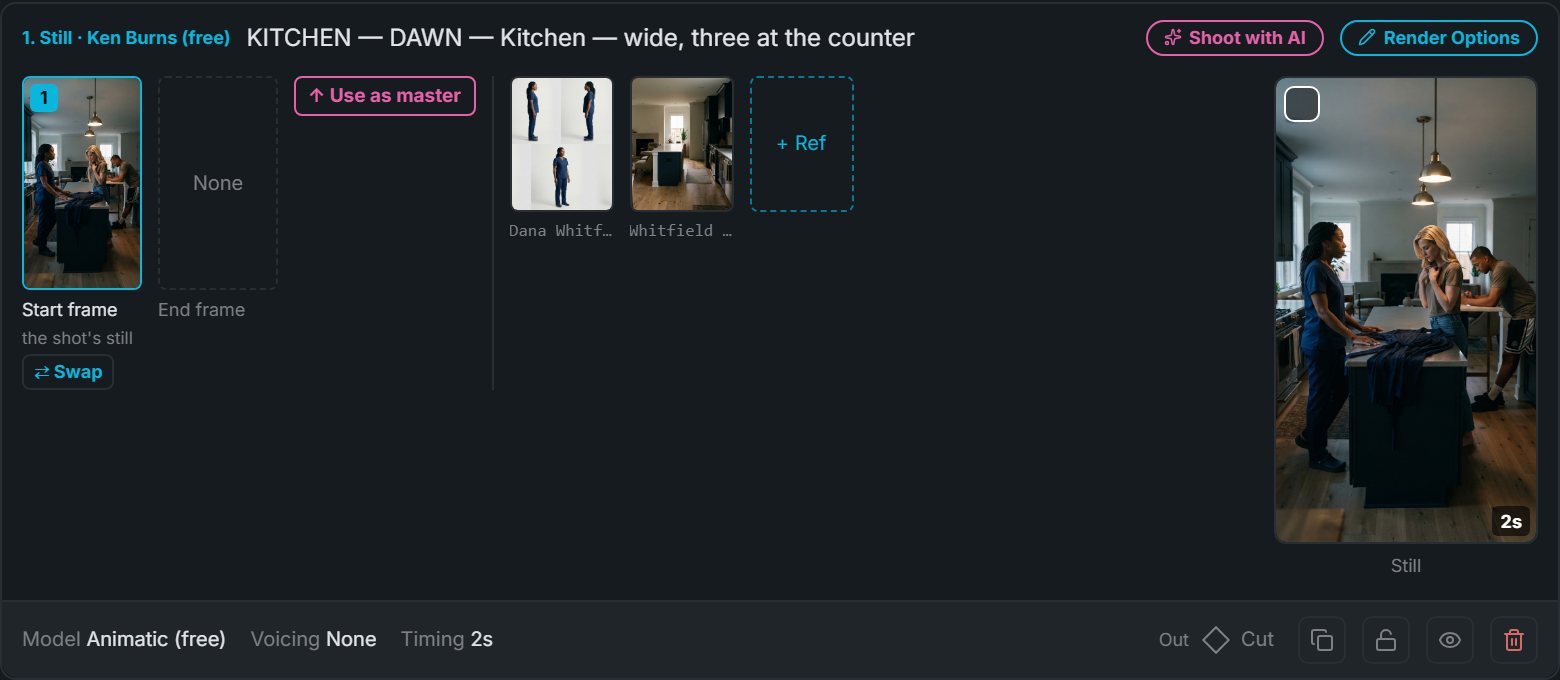
A shot card. From left: the start frame (with an end frame slot for a morph), Use as master, the reference sheets this shot draws against, and the finished still with its length. Along the bottom are the render model (here the free Ken Burns animatic), the voicing and the timing. Render Options picks a paid video model when you are ready.
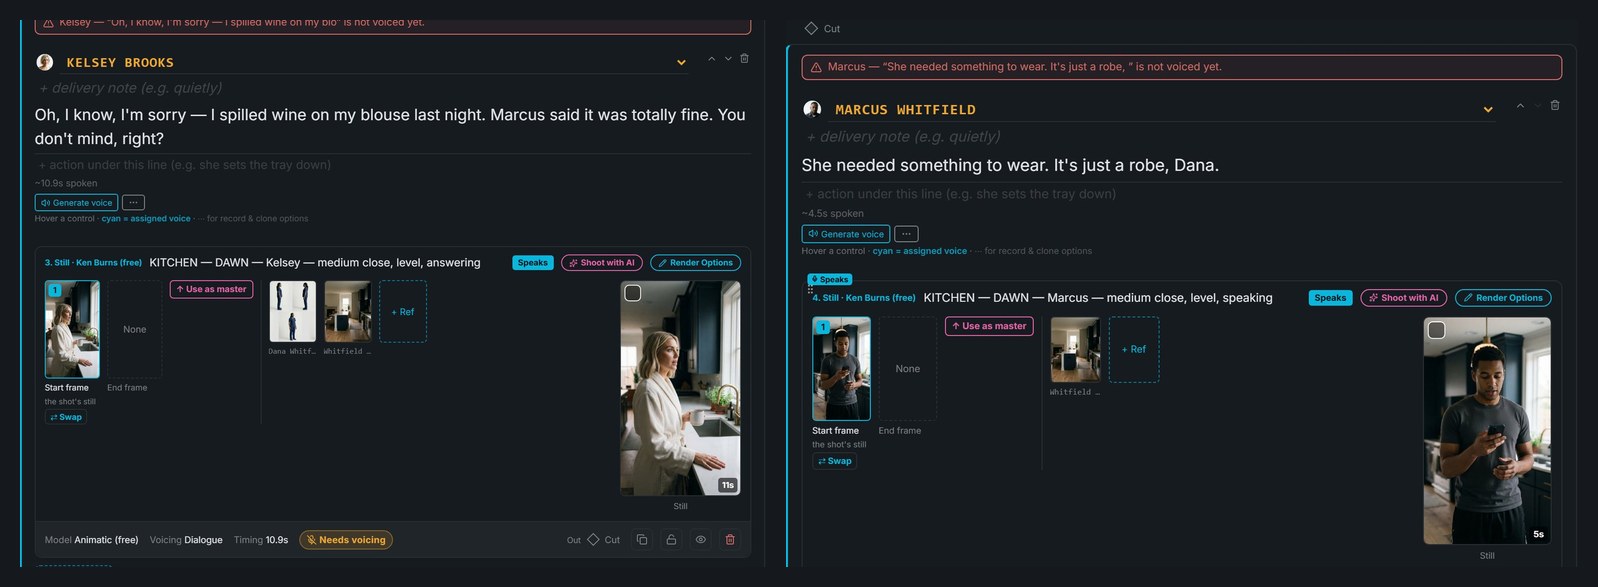
Left: Kelsey's line and its shot. ~10.9s spoken sizes the shot before a voice exists. Speaks marks the shot that performs the line on camera. Right: Marcus's line. The red bar says the line is not voiced yet, and names it word for word. Render scene in Step 8 records it.
Step 7 · Simple or Cinematic
The top bar has a switch that decides how Scene Flow writes video prompts for the whole project.

- Simple — the default. A compact prompt that still decides shot size, camera height, light, focus and sound. It suits a fast-moving microdrama where the performance carries the scene.
- Cinematic — longer prose in the style of our Board Agent. The camera moves for a stated reason, delivery verbs are specific ("says flatly", "says warmly"), and each shot ends where the cut should leave the eye.
The choice is saved with the project, so everyone working on it gets the same writer. It applies to Shoot with AI and to every Refresh of a video prompt.
Step 8 · Render Options, then Render scene
Every shot card has a Render Options button. It opens the shot's settings in a panel beside the scene, so you can change a shot and keep the Render scene button in view. Here is Shot 2, Dana's line, top to bottom.
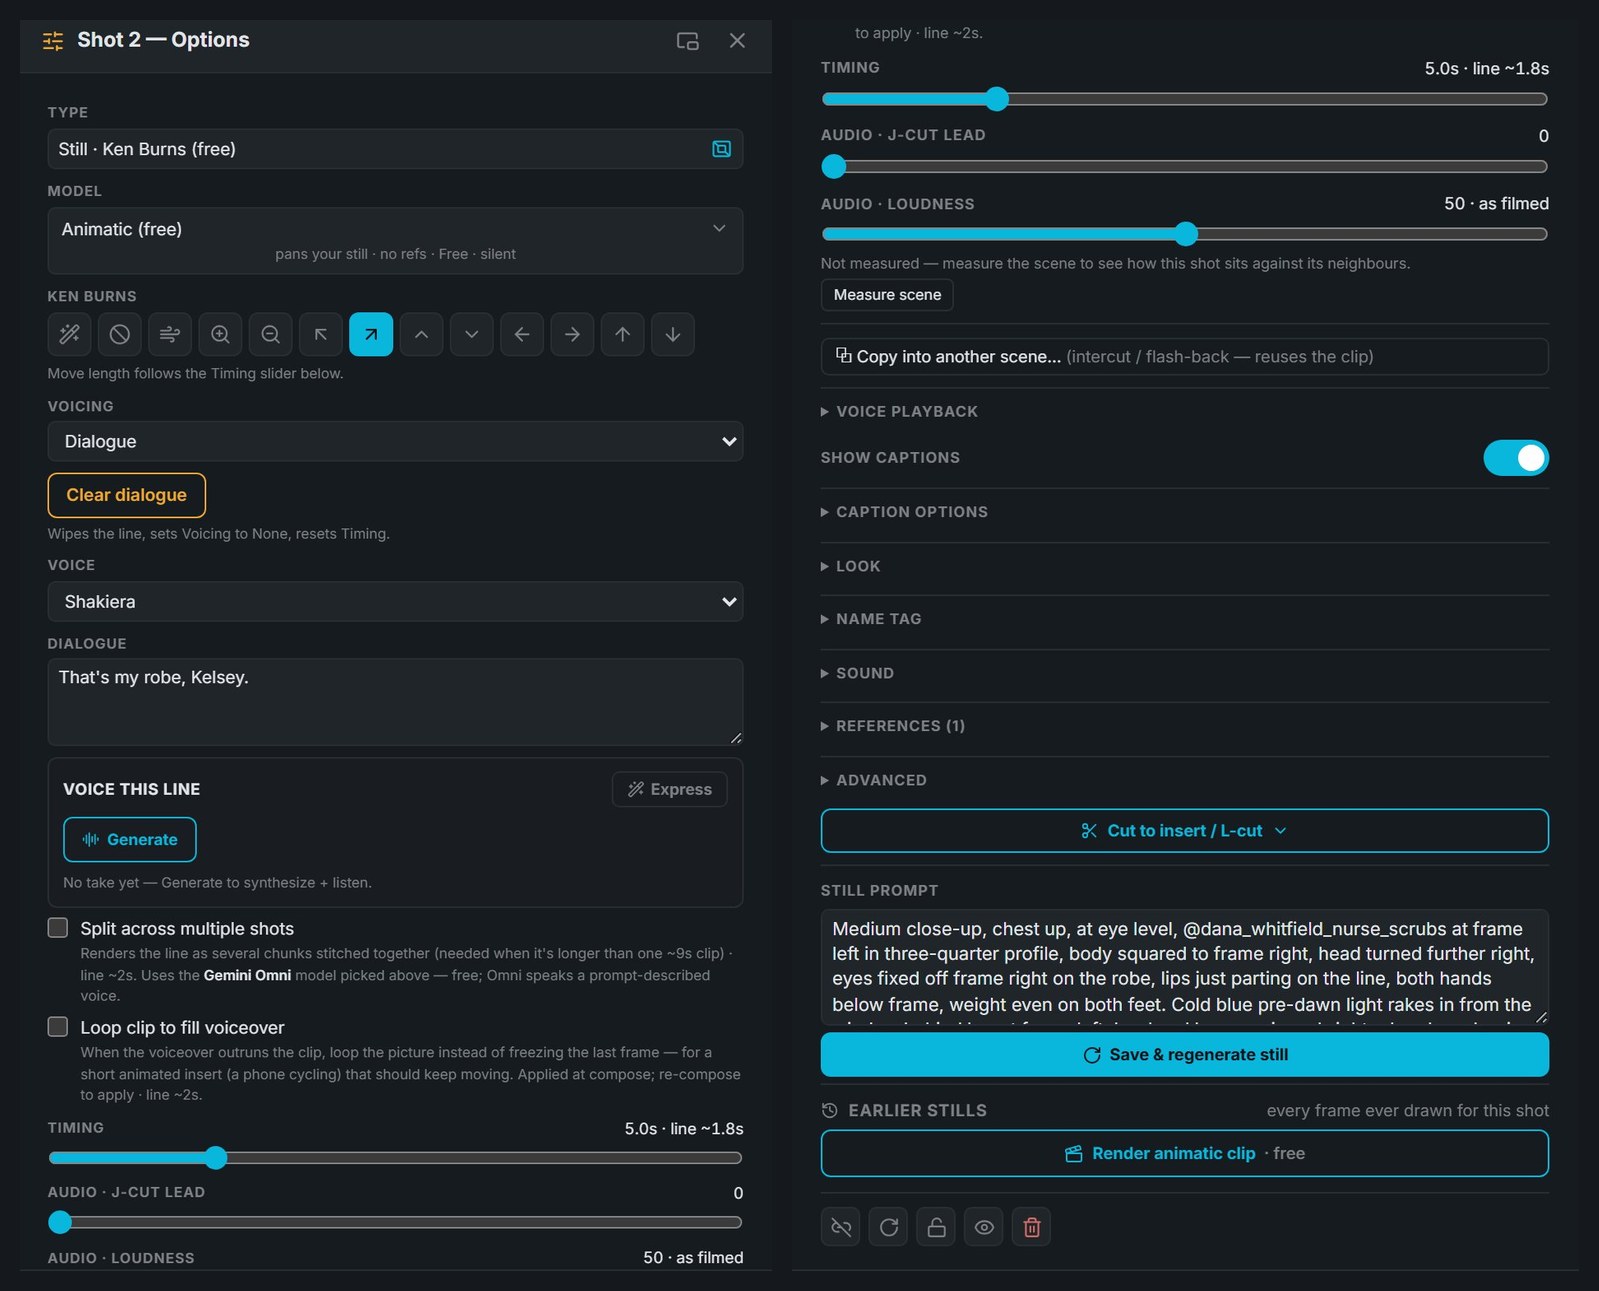
Left, the upper half: what kind of shot it is and how its line is spoken. Right, the lower half: sound, captions, finishing touches, and the shot's own still prompt.
What each setting does
| Setting | On Shot 2 | What it does |
|---|---|---|
| Type | Still · Ken Burns (free) | The kind of shot. A still type animates the drawn frame; a video type sends it to a video model. The type decides which models the next menu offers. |
| Model | Animatic (free) | Who makes the motion. Animatic pans and zooms your still: free, no references, silent picture. For this type the menu also offers Seedance 1.5-pro image-to-video, which starts on your still, takes an optional end frame and costs 10 cr per 5 s with native audio. |
| Ken Burns | Diagonal push | The move across the still: auto, none, drift, zoom in or out, a diagonal push, or a pan or tilt in any direction. The move lasts as long as the Timing slider. |
| Copy voiceover | (none) | Reuses another shot's recorded line on this picture. Free, and nothing re-renders. |
| Voicing | Dialogue | Whether this shot speaks, and how. Clear dialogue wipes the line, sets voicing to none and resets the timing. |
| Voice | Shakiera | The voice the line is spoken in, which defaults to the character's assigned voice. Dana's is Shakiera, an ElevenLabs voice cast for her when the episode was written. |
| Dialogue | "That's my robe, Kelsey." | The words, editable here. A change here is a change to the screenplay. |
| Voice this line | Generate, then Regenerate | Records the take now so you can hear it before rendering. Express switches to an acted delivery that follows the parenthetical. |
| Split across multiple shots | off | For a line longer than one clip (about 9 s): renders it as several chunks stitched together. |
| Loop clip to fill voiceover | off | If the line outlasts the picture, loops the clip instead of freezing on its last frame. Good for a short insert, like a phone screen. |
| Timing | 5.0 s · line ~1.8 s | How long the shot holds on screen, beside how long the line takes to say. |
| Audio · J-cut lead | 0 | Starts this shot's sound before its picture, so the line is heard over the end of the previous shot. |
| Audio · Loudness | 50 · as filmed | A level for this shot's own sound. Measure scene shows how it sits against its neighbours. |
| Copy into another scene | Reuses this clip in another scene, for an intercut or a flashback. | |
| Show captions | on | Burns the line in as captions. Caption options sets their style. |
| Look · Name tag · Sound · References · Advanced | collapsed | The colour grade for this shot, an on-screen name card for a character's first appearance, sound effects pinned to the shot, the reference sheets it draws against, and the rest. |
| Cut to insert / L-cut | Cuts away to an insert while the line keeps playing underneath. | |
| Still prompt | the prompt Shoot with AI wrote | Editable. Save & regenerate still redraws the frame from it. Earlier stills keeps every frame ever drawn for this shot. |
| Render animatic clip · free | Renders this one shot on its own, without touching the rest of the scene. |
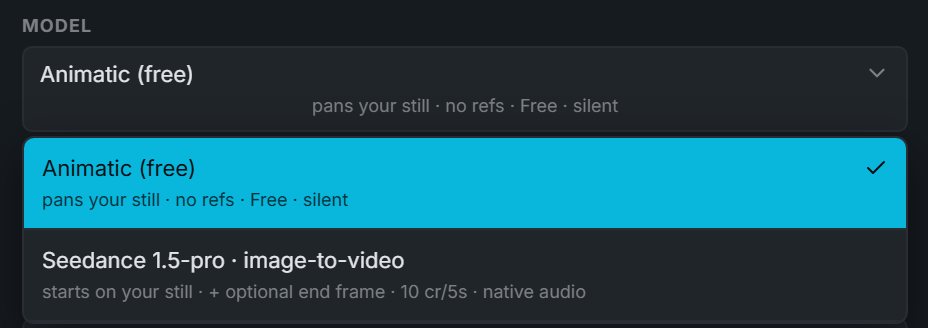
The Model menu prints each model's price and abilities in the menu itself, so the cost of a choice is visible before you make it.
Then we pressed Render scene
We left every shot on the free animatic and pressed Render scene. For each shot whose picture or sound changed, it records the voice, renders the Ken Burns clip, burns in the captions and mixes the sound. Then it assembles the six shots into one clip. A shot that hasn't changed since its last render is left alone, so a second press costs nothing for it. The button reports progress as it goes: Rendering 3 shots… 4 left, then Assembling scene….
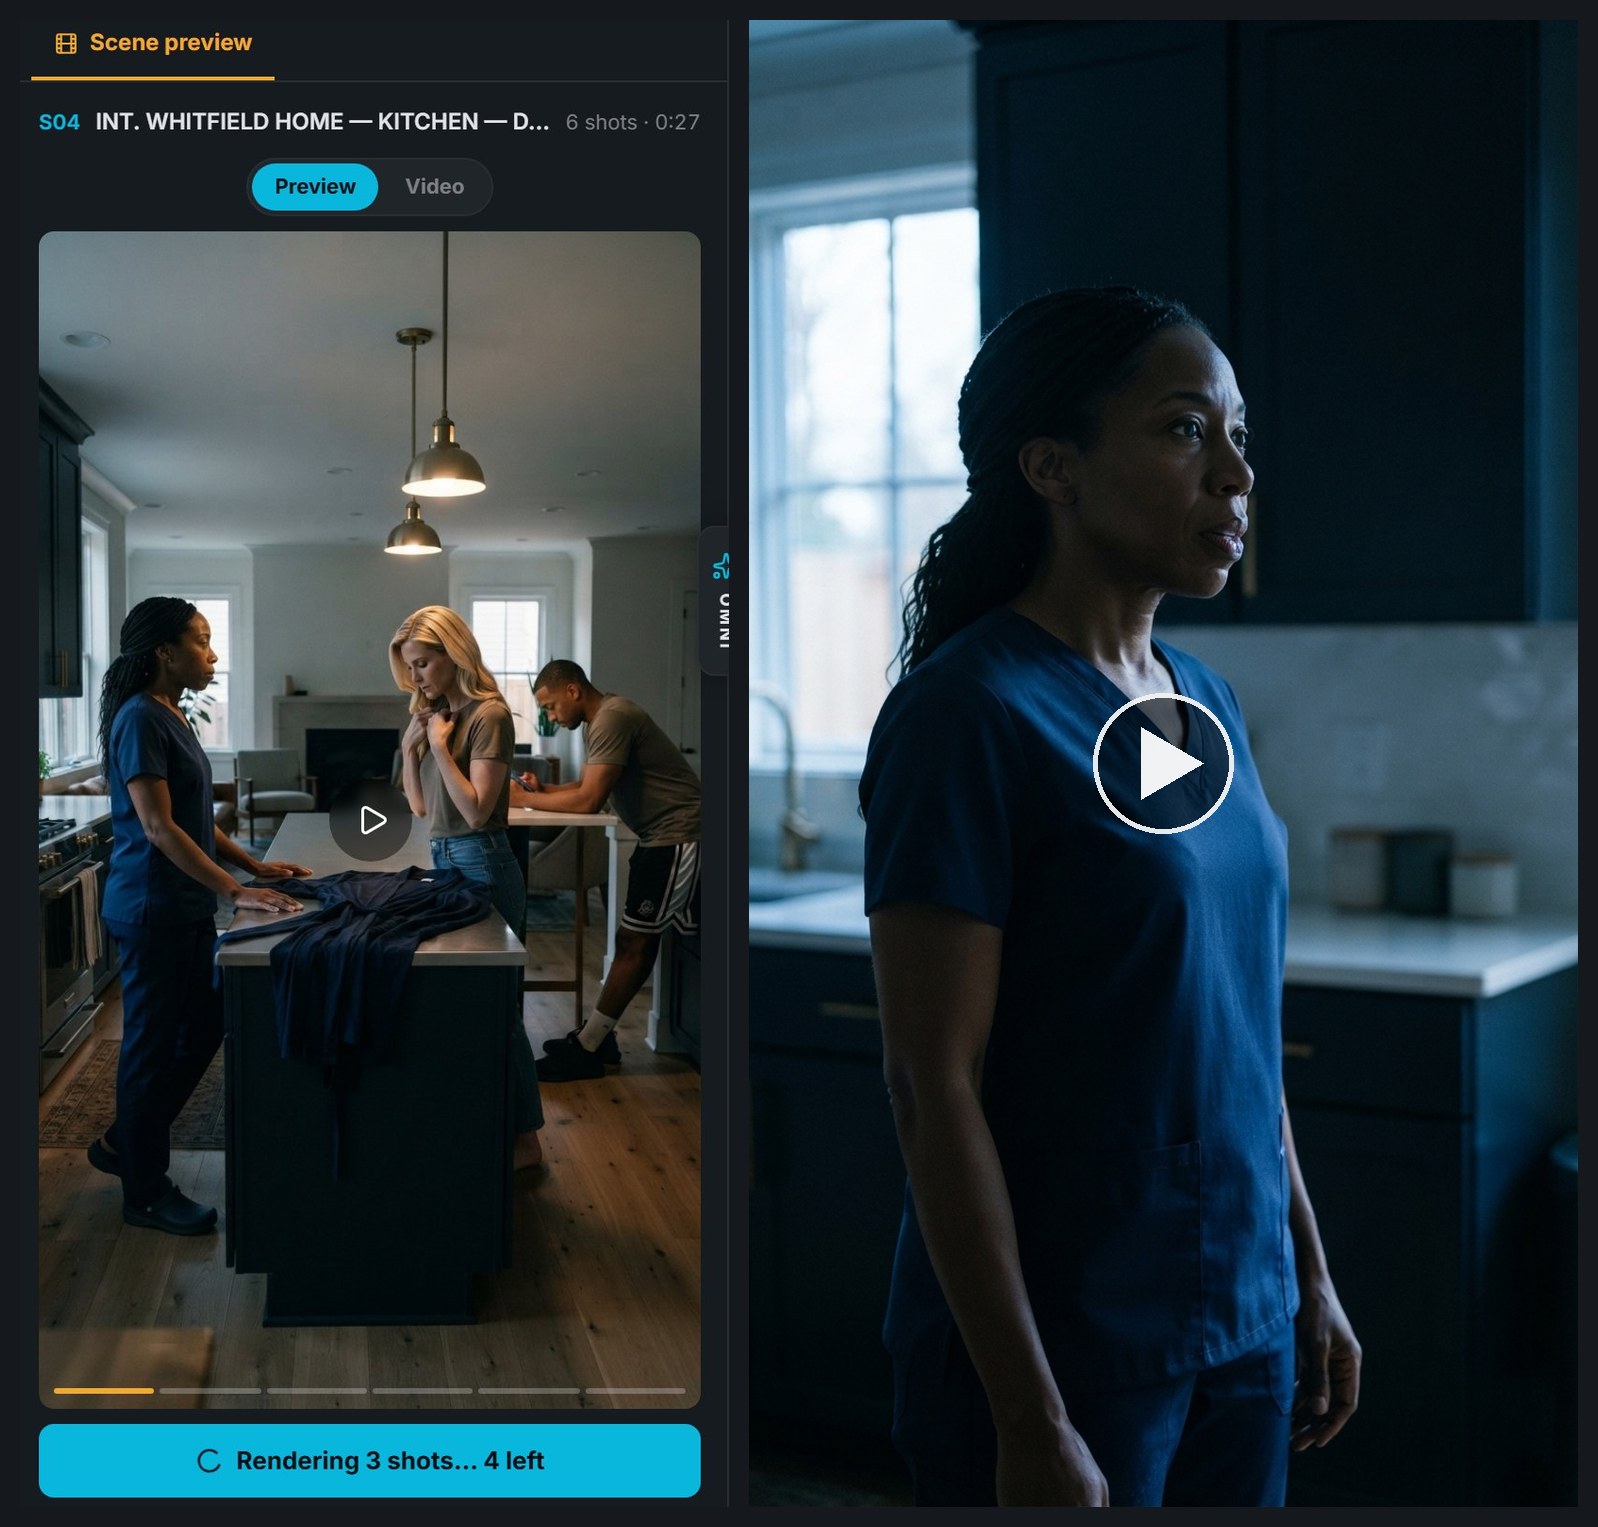
Left: while it works, each shot card shows its own Rendering badge, and the button counts down. Right: the result, exactly as Render scene produced it: 24 seconds, 1080×1920, three voiced lines over six animated stills, with captions. Play the rendered scene (24 s)
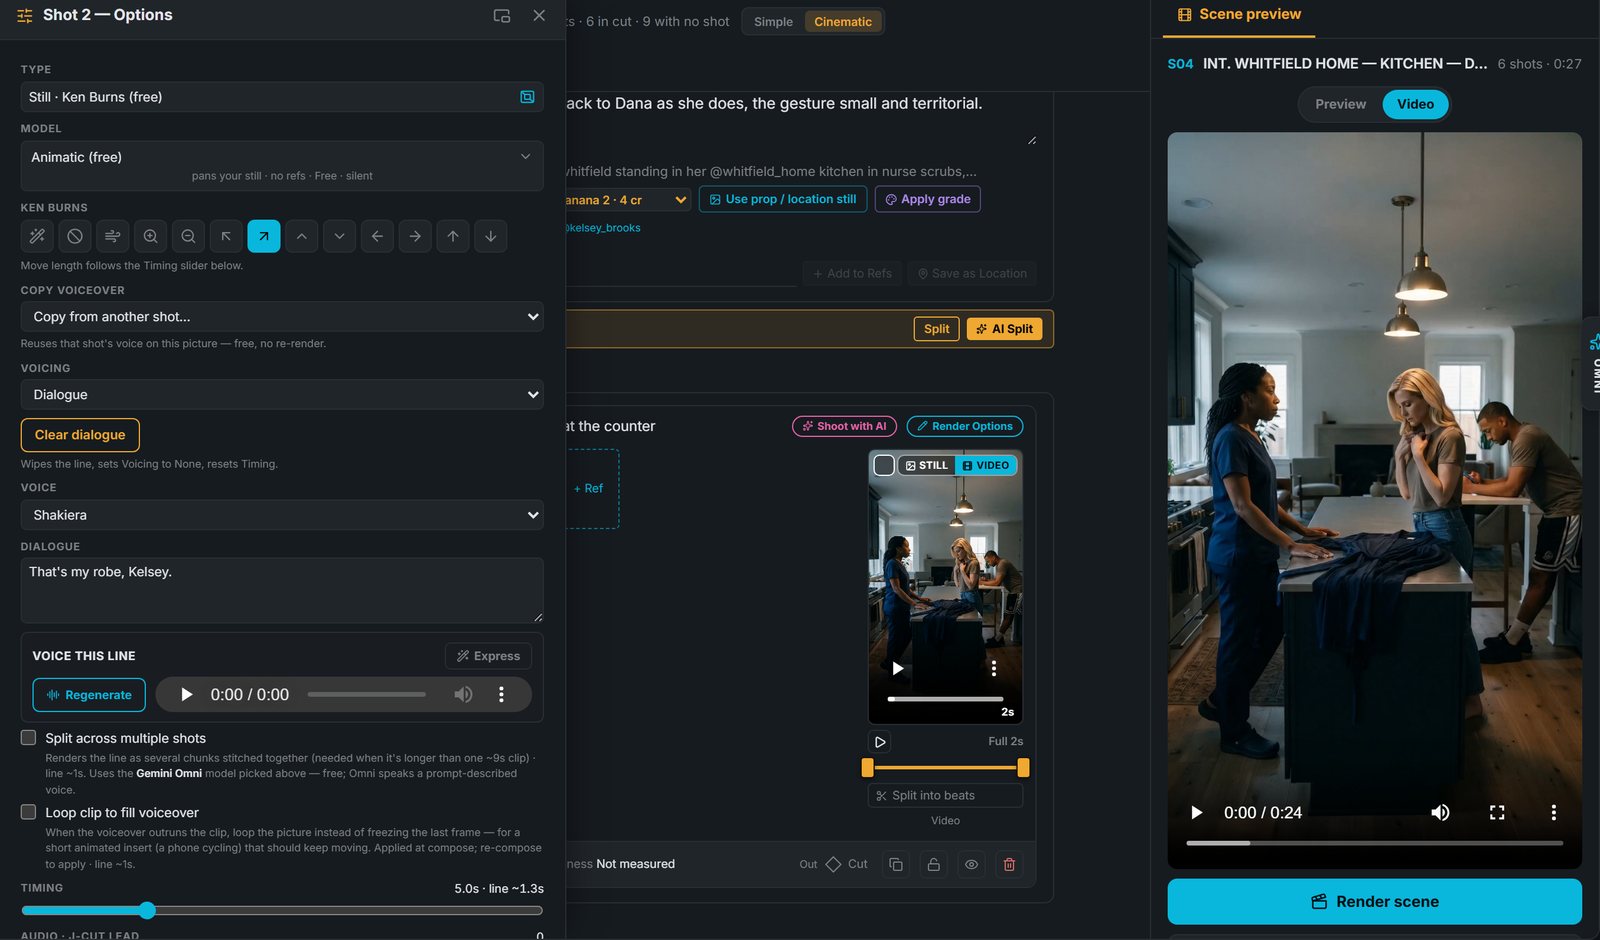
After the render. Dana's line now has a playable take and a Regenerate button, Copy voiceover has appeared at the top of the options, and the preview's Video tab plays the assembled scene. To upgrade a shot later, change its Model to a video model and press Render scene again; only that shot re-renders.
What we never did
We never opened the Script tab, never opened the Storyboard, and never copied a prompt from one place to another. The premise became an outline. The outline became a screenplay, the screenplay became six framed shots on one page, and one press turned those into a voiced, captioned 24-second scene. Each step showed its cost before we pressed it. The frames ran 2 credits a draw on Nano Banana 2 Lite, and the render itself was free on the animatic.
Screenshots: showmaker.studio, production, 11 October 2026. Demo project Her Stolen Life (Episode 1, Scene 4) was created for this article from the premise quoted above. Nothing has been retouched; images are cropped and resized only.
Related questions
What is Scene Flow in ShowMaker Studio?
Scene Flow is a tab in every ShowMaker project that shows one scene's screenplay and storyboard together. The action beats and dialogue lines run down the page, and each shot card sits directly under the beat or line it covers, with its start frame, references and still.
Do I still need to sync the script to the storyboard?
No. In Scene Flow an edit to a line or a shot is saved to both the screenplay and the storyboard row as you make it, so there is no separate sync step and the two cannot drift apart.
What does Shoot with AI do?
Shoot with AI frames one shot in conversation. It writes a still prompt from the scene so far and draws it, then writes the video prompt from the approved frame. You can edit either prompt directly or tell it what to change in plain words, and nothing is saved until you press Save to the shot.
How much does it cost to render a scene?
Each shot shows its price in Render Options before you choose. The animatic model that pans your still is free, so a scene can be voiced, captioned and assembled at no render cost, then upgraded shot by shot to a paid video model.
What is the difference between Simple and Cinematic prompts?
Simple writes a compact video prompt that still decides framing, light, focus and sound. Cinematic writes longer prose with motivated camera moves and specific delivery. The choice is saved per project and applies to every video prompt Scene Flow writes.
Every fix on this page is a feature, not a workaround.
ShowMaker Studio is built around these problems — reference-locked casting, location look signatures, coverage-based scenes, delivery-timed captions, and per-shot model routing. Start free with 200 credits: narration over AI stills, no card.